Tips to Create Drupal Themes with Dreamweaver
Drupal themes consist of PHP and web standards (CSS and HTML). You can use PHP with Drupal API and make Drupal theme without templates. Those who prefer markup can take advantage of templates within a theme folder when no custom code necessary. Such templates are known as TPL files because of their .tpl or .tpl.php file extensions.
You can install and run several themes at once with Drupal. Thus, one theme will be for administrators while the other is for site members. It is quite convenient in case you try to install new themes and want to prevent unintentional lock-outs from your site.
In short, Drupal is a mix of styles, graphics and templates. Note that templates use CSS, XHTML and some PHP. Each theme has so called regions that define areas of a page structure with <div> tags. Drupal add content to these regions. In case you have already used server-side includes for headers and footers of a web page you know what Drupal does with each region. The other important terms are nodes and blocks. Nodes are pages of content (news articles, blog posts, etc.) while blocks are secondary content that as a rule appears in the right of left sidebar columns (lists of articles, a new poll, etc.)
Do Your Best of Drupal Themes with Dreamweaver
By default, Dreamweaver can edit any Drupal theme template that ends in .tpl.php. However, Dreamweaver can’t support the Drupal API or other custom file types (such as .info and .module) used by Drupal for themes and modules. To avoid such a problem you can use this free Dreamweaver extension

Dreamweaver allows you to apply and modify styles efficiently while working with various Drupal templates. Just use Design Time Stylesheets feature that is located in the secondary menu of the CSS Styles panel. Each template should have a design-time link to each style sheet used by your theme. You can read more about it in the Dreamweaver help documentation about Design Time Stylesheets.
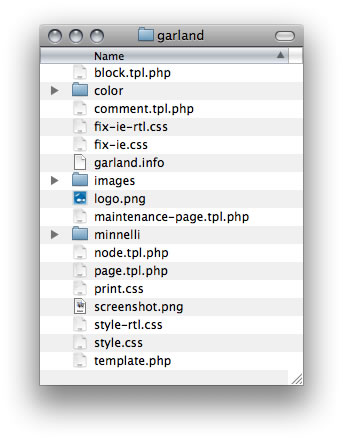
Each theme requires .info file with meta information for a theme such as the theme name, style sheets, description and regions. This .info file is a simple text file that is packaged with each Drupal theme to recognize. Drupal will not display your theme in the administration area without this .info file. Here is the sample of a Drupal theme folder called Garland.

Drupal .info file
The example of the Garland theme files displayed above shows style sheets, TPL templates (.tpl.php) and the theme declaration file .info file. Pay attention that the folder and the file name of the .info file are spelled the same. This file will define your regions, style sheets and scripts. Thus, .info file is the fist thing you should create. Here is sample of the Drupal theme .info file:
name = Untitled Theme
description = Our very cool theme made in Dreamweaver CS4.
screenshot = custom_screenshot.jpgversion = 1.0
core = 6.x
engine = phptemplateregions[left] = Left sidebar
regions[right] = Right sidebar
regions[content] = Content
regions[header] = Header
regions[footer] = Footerfeatures[] = logo
features[] = search
features[] = favicon
features[] = primary_links
features[] = secondary_linksstylesheets[all][] = styles.css
stylesheets[print][] = print.css
As we have already mentioned above .info file defines description, theme name, style sheets as well as some other important features. You should visit Themes administration page and learn more about such things as the .info file values and how Drupal displays these configurations. You also can read more about Drupal theme .info files online.
Drupal Theme Starter AIR application
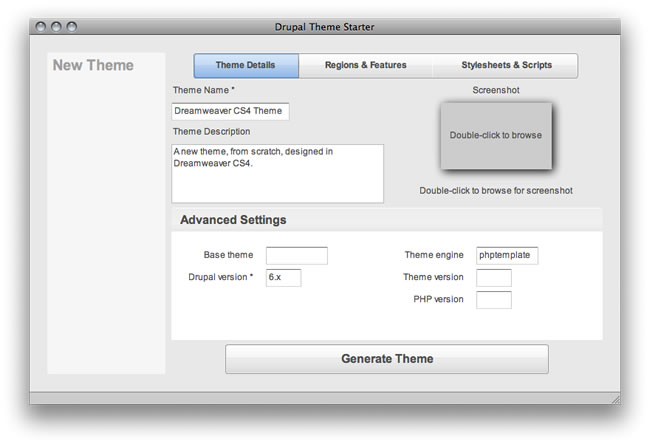
Dreamweaver as any other text editor can create and edit Drupal theme .info files. However, we offer you to learn more about free Adobe AIR application that produces custome .info files for themes. You can see the examples further. With the Drupal Theme Starter AIR application you don’t have to create .info file from scratch that really simplify the process.
First of all, download the application and define your theme .info file. Then you should use Dreamweaver to edit templates and styles. Fill in the fields in all three theme starter tabs as you wish and click the bottom button Generate Theme. It is quite important that the file name you export doesn’t start with a number or contains spaces and some special characters as well. Drupal will use the file name as the internal id for a theme and its settings.
So, let’s learn Drupal 6 Theme Starter AIR application in detail. Here you should define the theme meta info such as name, description and screenshot.

Then define theme regions and features.

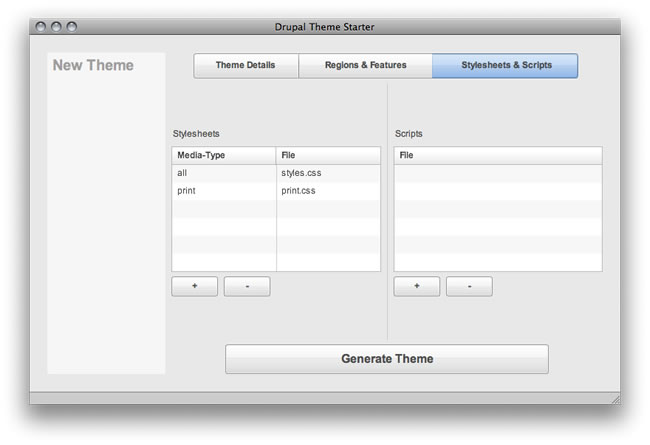
And declare theme style sheets and script files.

Dipping into Drupal core
All theme templates are based on code that ships with Drupal code. You can copy and edit templates from Drupal core itself or a core theme. You can take code from default templates, add your markup and styles and activate it as a new theme in the Drupal administration.
You need to launch Dreamweaver CS4 and create a new site definition for your theme folder. The rest of the necessary files for your Drupal theme will be collected here and your task is to follow the steps below:
1. Check whether your new theme folder has the same name as your .info file.
2. Put your theme .info file into the new theme folder. Don’t forget that the theme .info file name should match its folder name.
3. Open .info file to find out what scripts or style sheets are declared for your theme.
4. Create empty files for your style sheets and scripts inside this theme folder. You can insert code later.
Download Drupal 6 and open the themes folder. You can find the following template files in the modules/system folder, or in a core theme folder such as themes/garland. Copy them into your theme folder:
page.tpl.php: contains such XHTML tags as <html>, <head>, and <body>, as well as all <div> regions listed in the theme .info file.
node.tpl.php: defines node content that is pages, news articles, blog posts, etc.
block.tpl.php: template for blocks, which mostly appear in sidebar regions
Just copy and edit each file as you like. Don’t change file names, because Drupal will look for each template. You can add your own CSS class and id names within the markup.
You will use each template to build a complete page. Start with page.tpl.php, then load node.tpl.php for each node on screen, and block.tpl.php for any blocks that appear such as a login form, quick search, or lists of content.
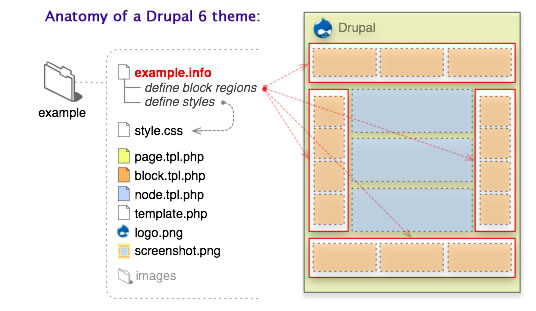
Each template is used to build a complete page, starting with page.tpl.php, then loading node.tpl.php for each node on screen, and of course, block.tpl.php for any blocks that appear such as a login form, quick search, or lists of content (latest blog posts, for example). Each template has a set of PHP variables that is replaced with your content (for example, $title is used for node) Read more about templates your theme can include in Drupal 6 Theme Handbook. You should refer to Figure 6 for a visual map of where each template is used. Note that each template is used like a server-side include. And NEVER edit core Drupal files.

It should be noted that page.tpl.php template doesn’t have <link> or <script> tags defined in the <head> tag. Drupal generates links to these files in proper order: at first, generates CSS <link> tags, then JavaScript <script> tags. Styles can be declared in multiple CSS files as well as in a single external file. However, to improve performance, Drupal 6 compresses all the CSS and JavaScript files into single include file.
Installing new Drupal themes
After you have done all the changes in your Drupal theme now you need to upload it to Drupal. Thus, you have at least page.tpl.php, node.tpl.php, and block.tpl.php files in your theme folder. And of course don’t forget about the required .info file that defines your theme. As we have already noted above you should never modify any core Drupal files, because all the changes will be lost the next time you update Drupal.
Go to your Drupal 6 installation folder and open the sites folder. The sites folder is where you are allowed to add your own modules and themes. Here you can add more than one site domain.
Here are the steps to prepare your Drupal installation for custom modules and themes:
1. First, always set your site Administration theme to a core theme such as Garland. Thus you prevent theme accidents while trying out new themes. Under the Drupal Administration screen, select “Administration theme” and click Garland, then “Save configuration”. Now you can add any new themes.
2. Add two new folders named modules and themes inside the sites/all folder.
You also can add two more folders inside sites/all/modules called custom and contrib. It separates modules your team creates versus modules you download from the community (contrib, short for contributed). Themes do not need this folder separation because most sites as a rule have more modules installed than themes.
3. Copy or upload your custom theme folder into the sites/all/themes folder and Drupal should recognize it under your Themes administration page.
The other important thing is that you should never add new themes and modules to the core folders (drupal/modules, drupal/themes). Add new only to your drupal/sites/all folder.
Visit the Drupal administration theme as soon as your theme is added to sites/all/themes.
Here is the sample of standard Drupal Themes administration area where you should find your custom theme listed with core themes.

If you don’t see your theme, then check whether it is in the right folder (drupal/sites/all/themes) or include a proper .info file in your theme folder.
Enable new theme and check content on your sites pages. In case something is missing, double-check whether all files are named properly and all templates are in your theme folder.
The site Theme cache should be flushed every time you update a theme folder. Visit or refresh the Theme administration screen to flush the site Theme cash. The theme cash is cleared every time the Themes administration screen loads. Thus, Drupal can register new themes and templates.
I run and wish to continue with CS4 but would like to be able to work with Drupal 7 themes. Does this or any other Drupal/Dreamweaver integration cover this?